
To Knot or Not to Knot?
This is a tutorial on how to begin a square without tying a knot, how to read a chart and follow a pattern, and how to make BEAUTIFUL squares with even warp and weft distribution.
To begin, if you DO want to start your square by tying a reverse slip knot to secure the yarn to your loom, see this short video (there are obviously other parts in this six-part series, and you’re welcome to watch those as well. But be prepared to die of boredom because not only is there no plot . . . well, you’ll see).*

Tie a reverse slip knot and attach it to one of the four pins near Cr1; begin warping as usual.
If you don’t want to tie a knot, there are a number of other options. I’ve heard of people taping the yarn to the loom, or (horror of horrors [because I don’t don’t like sticky stuff]) you can attach a bit of the hook half of hook-and-loop fastener (sometimes called Velcro) to the underside of the loom. I will refrain from explaining all the reasons why this seems a VERY bad idea to me. (Zoom Loom and Loomette have a notch cut into the frame of the loom near Cr1 where you can attempt to secure your yarn. In my experience ZL won’t hold the yarn and L will mildly shred it.)
It’s the easiest thing in the world to leave the yarn tail just hanging there loose. Just in case I want to use the yarn tail later, I leave a length roughly equivalent to 1.5 sides of the loom.
Yarn used in sample: Bernat Satin (BS) “Flamingo.” (Please see GLOSSARY for explanation of abbreviations.)

There’s a bit of slack in the first warp if you don’t tie a knot, but it’s not difficult to work with it this way.
After warping three layers and weaving R1, the needle goes under the free swinging beginning tail. R2 will secure the tail. HOWEVER, before moving on to R2, let’s look at a simple procedure that will truly beautify your weaving. I usually refer to it as snugging R1 against the pins.

See how R1 is in place, but isn’t particularly close to the pins?

I press down on all the threads while snugging R1 in close to the pins with my packing fork. Above, the right half is packed, the left isn’t.

Use your fork to pack L2’s first row close to R1 and you’re ready to weave R2.
The pattern/diagram we’ll be following is called, “Heart Band—Bar X, Mini.” (The written instructions are at the bottom of this post.)
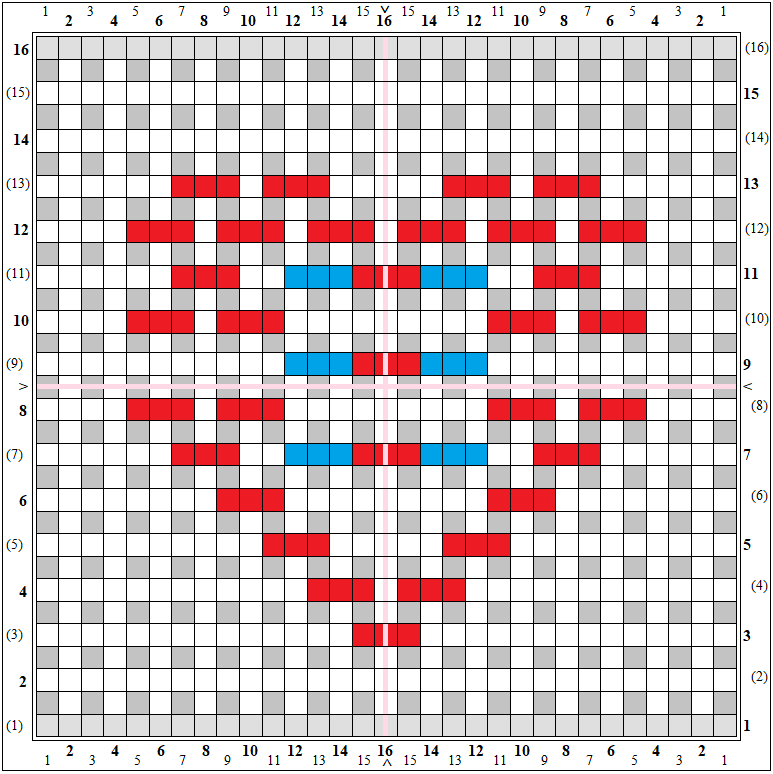
Heart Band—Bar X, Mini
In the diagram, R1 is all gray. That’s because it’s always a plain weave (P) row.
First tip for beautiful weaving: after each row, you may want to use the Tug Technique (I use the Tug Technique in all my weaving videos, but this one is very brief). This stops your wefts from taking up all the warp space as you weave so your weaving won’t be so difficult in the last rows.
For this pattern R2 is also P. Hold the loose yarn tail with your fingers while you start R2.

The photo for beginning R2 is shown right-side-up here. I always rotate the loom around so I can keep weaving with my right hand, but some people switch hands for even and odd rows.
For R3, look at the numbers across the bottom of the diagram. It tells you you’ll P14, U3 (three red squares = U3), then P14. The Wunderwag loom has a center mark top and bottom that tells you where the center strand is (it’s always strand #8 of L3, or #16 of the 31 combined L1 and L3 warps). So you really don’t need to count anything at all. Just P till you reach the three center strands and go under them, then P across. (You can count if you want to be sure you’ve done it right.)

This pattern is a mirror image of itself. Once you get used to following patterns and reading diagrams you’ll realize that you really only need to count the first half of mirror image pattern rows.
R4 builds on R3. You can count 12 stitches or P over to R3’s U3. Take the needle U3, catching two warps + the first of R3’s U3 strands, O1 (the center strand), then go U3 catching the third of R3’s U3 strands + two warps.

The up arrows point to R4’s U3s. The down arrow points to the center strand.
R5-7 continues the pattern of building the V part of the heart, expanding the V outward row by row.

R5’s first U3 catches two warps + 1 (red arrow) of R4’s U3 (greenish arrow).
R7 also begins the center openwork pattern of the heart motif (P2, O3, U3, O3, P2).

R7’s outer U3s (red up arrows) build on R6’s U3s (greenish up arrows). The blue up arrows indicate where the needle goes O3 (blue always means OVER in my diagrams). The red down arrow shows where the needle goes U3 between the two O3s. Once again, there should be no need to count once your brain gets used to interpreting what’s happening on your loom.
Continue weaving, challenging yourself to follow the diagram. Be sure to look at the tips below and use them while you weave.
Second tip for keeping your weaving beautiful: notice in the top left photo below how the warps have pulled away from the vertical side of the loom. Use your fork to push them back toward the pins (top right photo). Continue prodding the strands back into place with your fork, being careful not split your yarn (bottom left photo). You can do this as often as necessary to keep your warps and wefts evenly distributed.

Keep those warps and wefts in line with your pitchfork!
Third tip: if your loose tail looks messy, give it a little tug to straighten it out. (Don’t pull too tight!)

Straightening warp 1
If you’re using a light worsted weight yarn (such as CSS, YBSS, or BS), the inner pattern of the heart will create an airy open look. RHS will show a bit less openness.

Heart Band—Bar X, Mini with needle in R11
Here’s a demo of using your fork to make room for the last row of weaving.

Use your fork to get all the room you can at the top of the loom
One more tip—for an easier beginning of the last row: if you’re using a Wunderwag loom you’ll have extra long pins, so you can feel quite safe during this procedure (but it’s not THAT risky). At R16 (R24 on a 6″ loom), Cr3, lift the weaving up a bit on the pins; take the needle straight down into the loop, then scoop it under the first warp. If you’ve used your fork to make space, the final row will be fairly easy to weave.

The final frontier: Space for that last row
If you’re planning to work in the final yarn tail, here’s how you might choose to do so (for a full demo see FUTURE BLOG POST).

Working in the final yarn tail horizontally
Take a moment to admire (and check for mistakes) your finished square.

All done!
Then pop it off the loom.

Heart Band—Bar X, Mini
WRITTEN INSTRUCTIONS
R1: P
R2: P
R3: P14, U3, P14
R4: P12, U3, O1, U3, P12
R5: P10, U3, P5, U3, P10
R6: P8, U3, P9, U3, P8
R7: P6, U3, P2, O3, U3, O3, P2, U3, P6
R8: P4, U3, O1, U3, P9, U3, O1, U3, P4
R9: P11, O3, U3, O3, P11
R10: Rpt R8
R11: Rpt R7
R12: P4, (U3, O1) x 5, U3, P4
R13: P6, U3, O1, U3, P5, U3, O1, U3, P6
R14: P
R15: P
R16: P
**********************************
*There is another form of knot tying which involves making a slip knot and lassoing the first two warps of L1 around the pins. I’ve never tried this method and probably never will. It feels akin to putting Velcro on the loom . . .
Hi, Sue! I am an absolute beginner. (Although I have done pot holders.) I am looking for the most basic information on what fiber to purchase, how much yarn should I allot for one piece, and after the knot – what comes next? I know to leave a tail but how do I begin to work? What do I do with the not-a-tail? How long should it be? How do I start to actually “weave?” I have several looms but cannot figure out how to begin. Is there a “Pin Looms for Dummies” part of your site?
Thanks for any help.
Hi Kathy,
First of all Beginners and Dummies are two different things, but I get what you mean. My dad used to say he wanted a Computers For Primates book.
I’ve written many blog posts in the past for beginners; they’re mostly on Windsweptmind.com, but that blog also has a lot of other types of posts mixed in. I’ve listed windsweptmind’s posts on PL basics below. I hope you’ll find them helpful.
Here on Adventures… you can look at the Diagrams, Pin Wraps and Yardage, and Glossary pages (found at the top of the screen) for a lot of the information you’re seeking. You can also watch the boring videos I referred to at the beginning of this post. Just click on the green words and that will show you the first video (which is about 30 seconds). After Part 1 plays, Part 2 should come up, then Part 3, and so on. Or, you can find all the video links in this blog post: http://windsweptmind.com/2016/02/29/basic-pin-loom-weaving-weave-it-and-zoom-loom/
This blog post is another with good basic info: http://windsweptmind.com/2016/04/05/pin-loom-basics-corners-and-numbers-and-loops-oh-my/
This one also contains a lot of basic info: http://windsweptmind.com/2016/04/24/how-to-avoid-mis-adventures-in-pin-loom-weaving-trouble-shooting/
I really appreciate questions like yours. I’ve been meaning to gather all this information and make it more readily available. Little by little, as people ask about particular things, I’ve been going back through what I’ve already written and organizing it. Think I’ll write another blog post about that!
what does P mean?
“In the diagram, R1 is all gray. That’s because it’s always a plain weave (P) row.”
Info on abbreviations is in the Glossary: “P — Plain weave: taking the needle over, then under (or under, then over) one stitch at a time. Some people use W to indicate plain weave, but I don’t like it as it gets confusing with W also referring to warp and weft.”
Thanks for asking!
Thanks, I didn’t see the glossary
Pingback: Open Weave Heart (medium sized) — 6″ Pattern – Adventures in Pin Loom Weaving