
***Please refer to Glossary page for explanation of abbreviations. See Diagrams if you need help with basic warping.***
Maple Leaf
(make two for the Fall Banner)
One-Color Sample: RHS “Tangerine”

Maple Leaf
Demo Sample: L1-3: CSS “Sunshine,” L4: RHS “Toast”

Two-color Maple Leaf (with L2M)
Instructions
R1: P
R2: P14, U3, P14
R3: Rpt R2
R4: P4, (U3, O1) x 5, U3, P4
R5: P6, (U3, O1) x 4, U3, P6
R6: Rpt R4
R7: P2, (U3, O1) x 6, U3, P2
R8: (U3, O1) x 7, U3
R9: Rpt R7
R10: (U3, O1, U3, P5) x 2, U3, O1, U3
R11: P2, U3, P5, (U3, O1) x 2, U3, P5, U3, P2
R12: P12, U3, O1, U3, P12
R13: P10, (U3, O1) x 2, U3, P10
R14: Rpt R12
R15: Rpt R2
R16: P
If you look closely at the stem of the orange leaf above, you’ll see what I call an “extra long” vertical stitch. This is caused by going U3 on both R2 and R3 in the same place. If you don’t like that look, you can do Layer 2 Manipulation (L2M)—either simple or complicated. I’ll demonstrate the two versions of L2M after the two-color demo. The yellow and brown leaf above shows the simple L2M.
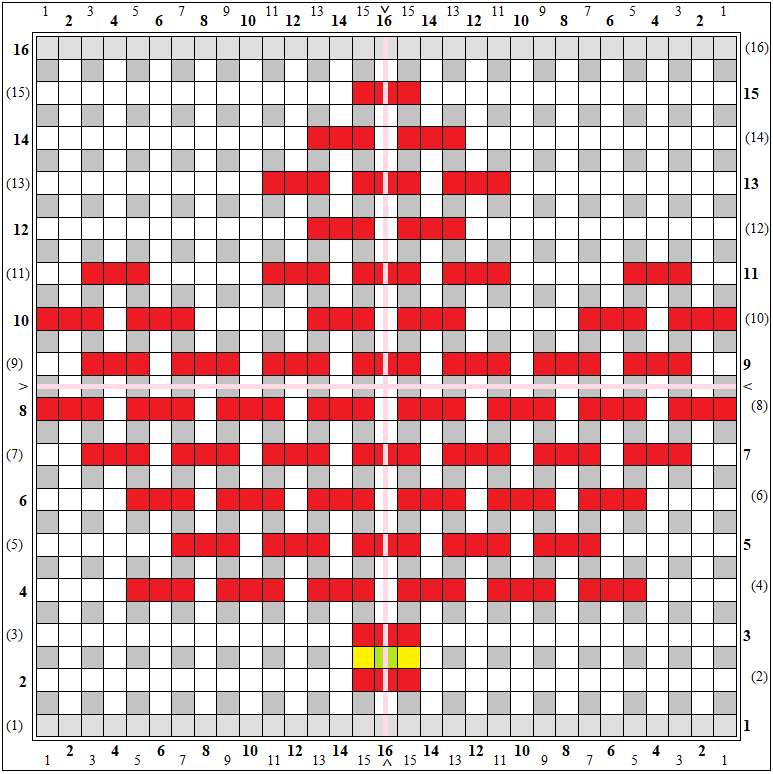
Green mark indicates L2M of L3
Yellow marks indicate L2M on L1 (and should be combined with the green mark)
WORKING WITH TWO COLORS AND WEAVING IN ENDS AS YOU GO
To start, it’s very helpful to know how to tie a reverse slip knot. I demonstrate it in this video. (Never thought this video would come in handy as a stand alone!)
Also, see this video for a demonstration of two-color weaving, working in ends as you go (using a different weaving pattern). It’s an old video and I think it doesn’t show how to work in the L4 tails (please don’t ask me to watch it again, I don’t think I can stand it!). That procedure is shown in the following instructions.
- L1, color 1: Loop your reverse slip knot over a pin at the top (3-4) edge of the loom. I like to use the third pin so I can easily move the loop later on. Bring the tail outside the pins, down to Cr1 and wrap as shown in first photo above.
- Now come 360 degrees around pin 1 and warp the loom as usual—this will leave a strange loop around the Cr1 pin which we’ll take care of in steps 10-12. When you finish *L3, tie another reverse slip knot at the end of a long tail, as shown in the second photo.
*Perform L2M after cutting L3 end, but before tying reverse slip knot. Make sure to leave a long enough piece of yarn for the knot. - Secure the ending yarn tail to a pin on the 3-4 edge of the loom; snug the knot around a pin. Go back over to Cr3, lift the L3 warp as shown, free the first slip knot (third photo).
- Replace the warp, then replace the slip knot, but don’t snug it against the pins (fourth photo).

- L4, color 2: Leave a longish tail (3-4″), tie a reverse slip knot, and loosely secure it to a pin right of the center mark on your loom (first photo above). This is so you can see the center mark as you weave. If your loom doesn’t have a center mark, secure the tail near the center.
- Wrap the yarn 5 times around the loom and cut near Cr2. Thread needle and get ready to weave!

- Now for the tricky part. Row 1 (this is shown in the top right photo): At Cr2, take your needle point down through the outer loop, pull it a little away from the pins, and scoop Under the outer tail and the first warp as though they were one thread (see also the photos for R2). Continue weaving Over, Under across R1. Exit the row by going Under last warp and Over outer tail (shown in top left photo). The bottom photo shows R1 complete (with needle in place).

- Row 2: These photos show a close-up of pulling the loop away from the pins and scooping Under the tail along with the first warp.
NOTE: As you weave, catching the L1 beginning outer tail along with the first warp, you need to be careful not to split the yarn. Splitting the yarn makes it difficult to tighten the outer tail—see steps 10-12 below. (I routinely forget steps 10-12 until I’m about to weave R16, and usually I’ve split the yarn. You can still tighten the tail a little bit at a time, but it requires some finagling.) - Continue weaving and following the pattern instructions. Please note: at the end of every row except R1, you will exit the row going Under the last warp and the outside tail together; begin each row going Under both and end each row going Under both.
- After weaving several rows, you need to stop and perform a maneuver: working in L4’s beginning tail and tightening L1’s beginning tail. You’ll need to borrow your weaving needle for this step, so remove it from your working yarn and set it aside for a moment. Lift L4’s beginning reverse slip knot from the bottom central pin and untie it by gently tugging it; it should slip right out. Insert the weaving needle Under the little clump (including the outer loop) at Cr2 and Over the second warp. Continue across, following the same path as R1. Keep the needle in place, then thread the needle with the beginning tail and pull the yarn through.

Close-ups of needle work for working in L4 beginning yarn tail. Note in second photo that I split the yarn with the needle when exiting the row. In third photo I corrected the mistake.

Working in L4 beginning yarn tail: first, needle in place and, second, yarn pulled through into place.
- L4 beginning tail is now worked in. It’s time to tighten L1’s beginning tail. The steps may seem complicated to explain, but hopefully they’ll make sense! (Some of the photos show the loom with Cr1 furthest away from you which is how I work on that Cr; some photos are sideways—that was to get them all to fit in the same montage.) Using the eye of the needle, lift the wonky yarn tail wrap up off Cr1 pin (shown in first two photos). Lift the beginning reverse slip knot off the 3-4 edge pin (third photo); don’t untie the knot.

- Gently pull the L1 yarn tail toward Cr3 till the loop at Cr1 is closed tightly against the first pin on the 1-3 edge (fourth photo). Take the reverse slip knot and loop it over any pin on the 3-4 edge and pull it tight (fifth photo). You want to keep the yarn tail close to the pins because you’ll continue to work it in as you weave.
- Continue weaving in pattern stitch through R16.

R16 finished
If you’re using the ending yarn tail to join the pieces, don’t worry about working it in. If you want to complete the doubled yarn “frame” around your square, follow step 14 below.

- After completing R16, turn the needle around and go back (photo directly above)—Over the outer yarn tail and Under the first warp (photo at right above). Continue following the same Over, Under path as R16. When you get to the clump at Cr 3, I can’t tell what’s happening there, so I usually run the needle through the center of it (photo at left above).
- When you take the finished square off the loom, you can gently tug these worked in ends till you get the shape just right.

Back view of finished Maple Leaf


LAYER 2 MANIPULATION (L2M)
SIMPLE METHOD
After warping L3 cut the yarn, leaving a generous end, but don’t tie the reverse slip knot yet. Unweave L3 back to warp #7. Thread the needle with the L1-3 yarn and run only warp #8 Under the L2 #2 strand, then finish warping.

Simple L2M
Tie reverse slip knot near Cr4 and proceed with L4 and pattern instructions. Your leaf stem will look like this (left) instead of this (right).
COMPLICATED METHOD
After warping L3 cut the yarn, leaving a generous end, but don’t tie the reverse slip knot yet. Unweave L3 and L2 back to L2 #1. Thread the needle with the L1-3 yarn and run L2 #2 Under L1 #8 and #9. Finish warping L2 and L3 through warp #7. Thread warp #8 Under L2 #2, then finish warping. Tie reverse slip knot near Cr4 and proceed with L4 and pattern instructions.

First photo shows L2 #2 going Under L1 #8 and #9.
Second photo show L3 #8 going Under L2 #2.
Third photo shows the completed L2M ready for L4.
Your leaf stem will look like this.

Two-color Maple Leaf with L2M (complicated method)
I realize this is A LOT of information especially for beginners. I can’t tell you not to be overwhelmed; please remind yourself, “I can do hard things (and Sue is there to help!).”
***Don’t forget to make two of the maple leaves for your banner.***
Sneak peek at what’s coming . . .

Fall Banner (in progress)
Pingback: Bucilla 11, modified (+ variation) — 4″ (31 x 31) pattern – Adventures in Pin Loom Weaving