I received a request for clarification on how to make the Loomette afghan called The Charleston. The afghan is found on the eloomanation website in the book titled “The Loomette Handbook—New Weaves, Vogues and Suggestions” (1938). The Charleston is pictured on the cover; instructions are found on p 27 and 35. Unfortunately, there are no assembly instructions and no explanations for which squares go where. Without actually attempting to assemble the concoction myself, I don’t know how helpful I can be…
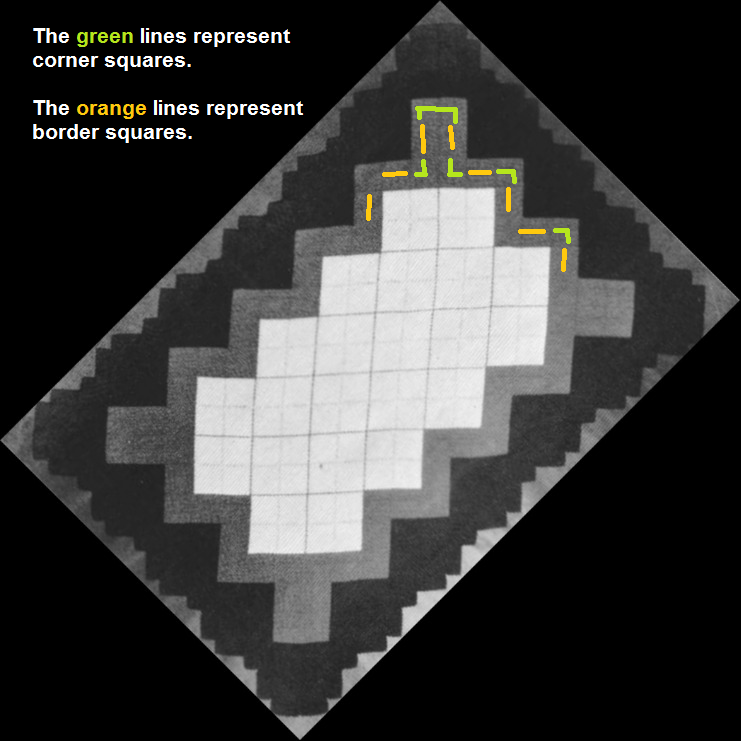
I hope it’s OK to use this modified version of the photo from the Loomette Handbook (see link above). It’s really helpful to be able to see the layout of the afghan.
The instructions for The Charleston afghan (pictured on the cover and on page 27; additional instructions on page 35) say to use dark brown yarn to make 80 squares using the B-25 pattern and 20 squares using plain weave. (They say you’ll need 6 hanks [or skeins] of their suggested yarn to make these 100 dark brown squares.) It’s my guess that the 80 patterned squares are sewn into 4-square blocks; the 20 plain weave squares will form the outer border of the afghan.
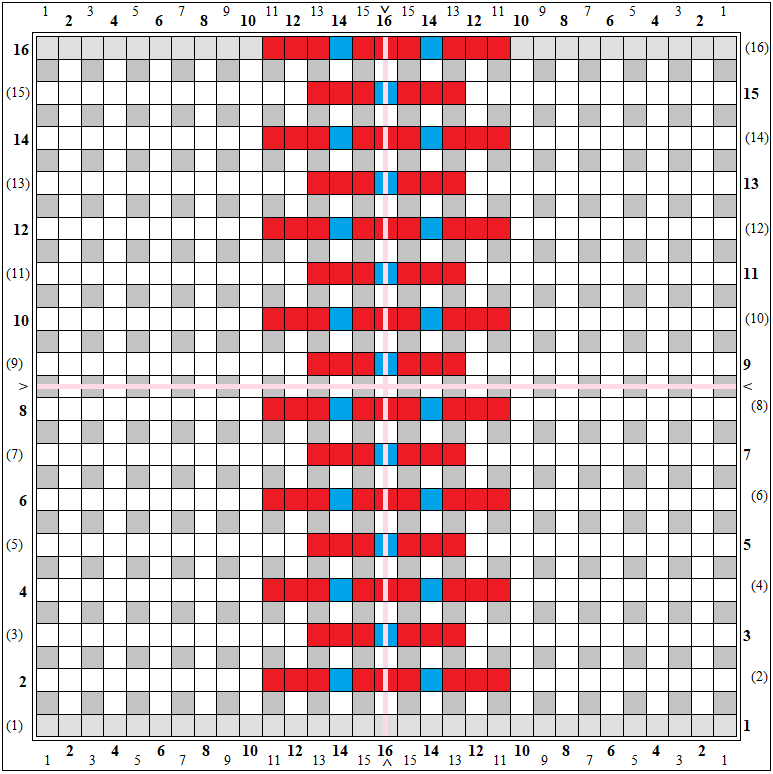
For the next section in toward the middle and using beige yarn (3.5 hanks), you’ll make 68 squares and will use 4 different patterns (B-31, B-32, B-33, and B-34). The photo caption doesn’t say how many of each; you can count them using the photo. Page 35 has written instructions for each of these pattern weaves. (There’s a mistake in the written instructions for weave B-32, 8R. They’ve given you 33 stitches to perform in a 31-stitch row. The instructions should be the same as 9R in the B-31 pattern, in reverse.)
You will also use the B-25 pattern to make 88 parchment colored squares (4 hanks of yarn). The colored cover photo shows that yellow yarn is used to join the middle (parchment color) blocks—22 blocks made up of four squares-joined-with-parchment-yarn; these blocks are then joined to each other with yellow yarn. You can detect the color difference even in the black-and-white photo.
You can calculate yardage amounts by multiplying the number of squares by 8 yards per square, e.g. for 100 dark brown squares, you need 800 yards of dark brown yarn.
I don’t know what method they use to join the squares, but the yellow yarn shows clearly in the photo, so I guess it’s a somewhat decorative joining method.
MAKING THE 4-SQUARE BLOCKS (dark brown and parchment)
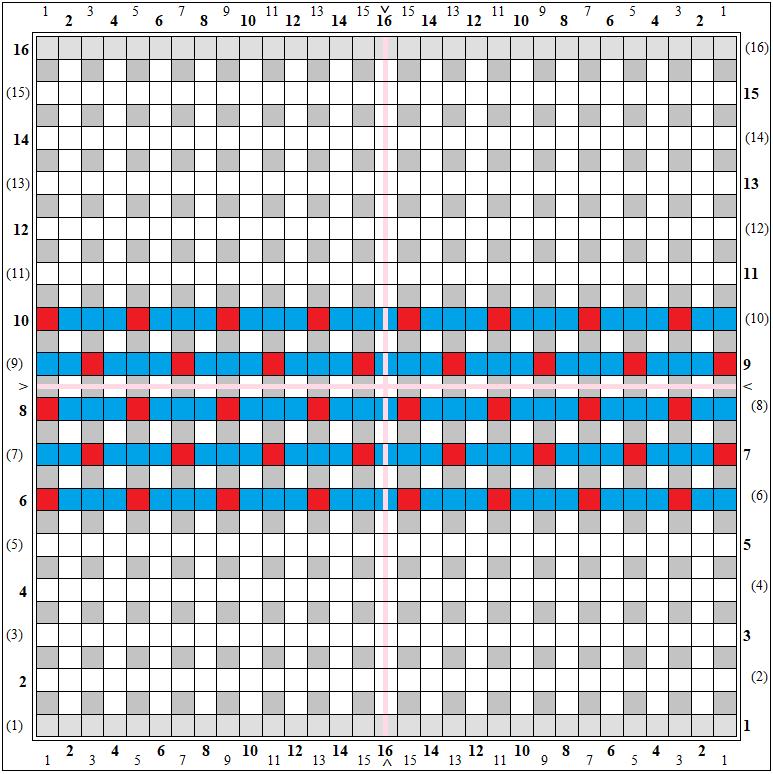
Loomette asks the weaver to use pattern weave B-25 for most of the squares. What they don’t tell you is that all those B-25 squares will be assembled into 4-square blocks. The 4-square blocks make up the outer frame and main body of the afghan.
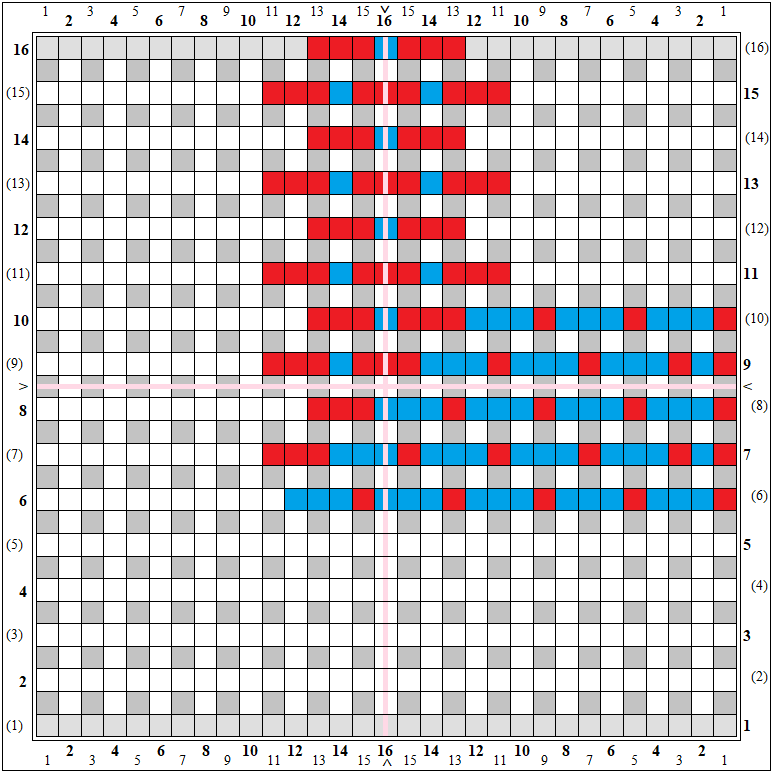
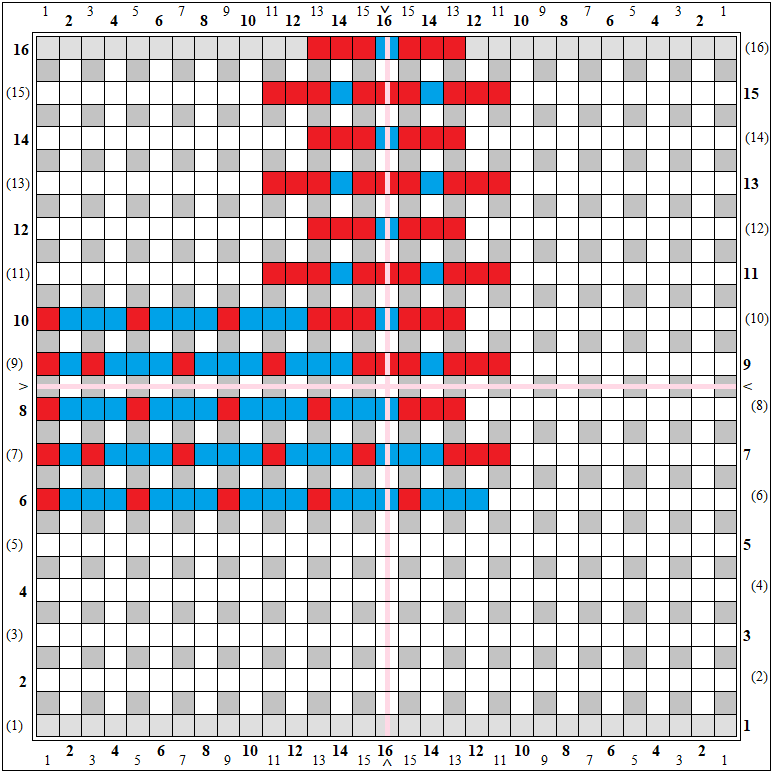
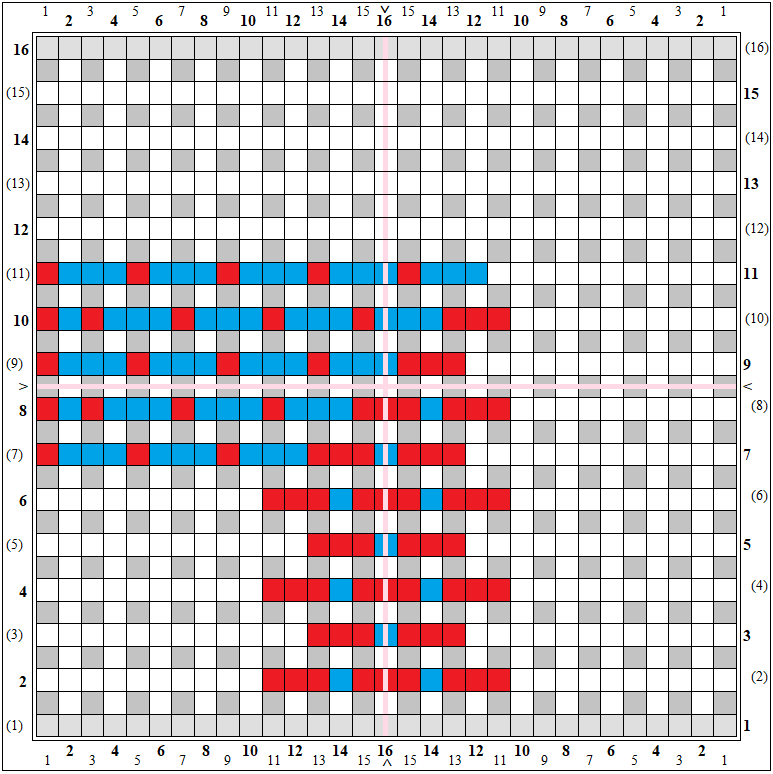
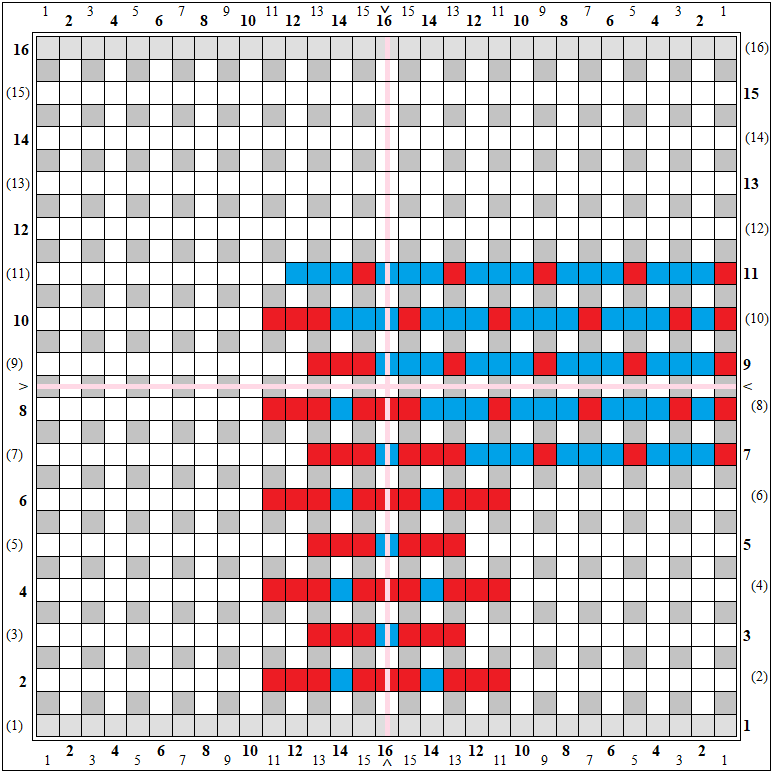
In addition to B-25 squares, they’ve included some Charleston-specific pattern weaves (B-31, B-32, B-33, and B-34). They don’t tell you how many of each or specifically where to put them (or how to join them together).
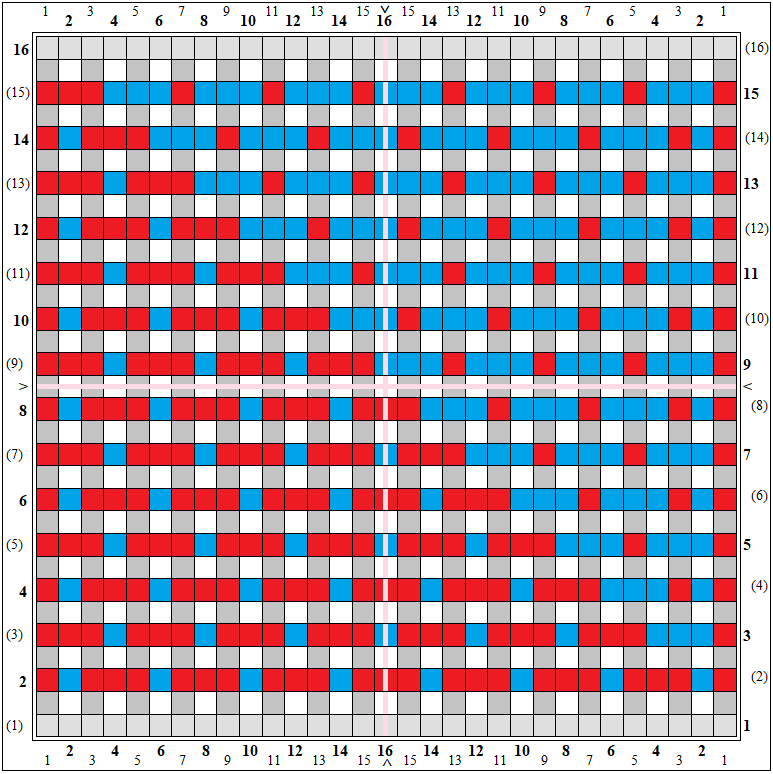
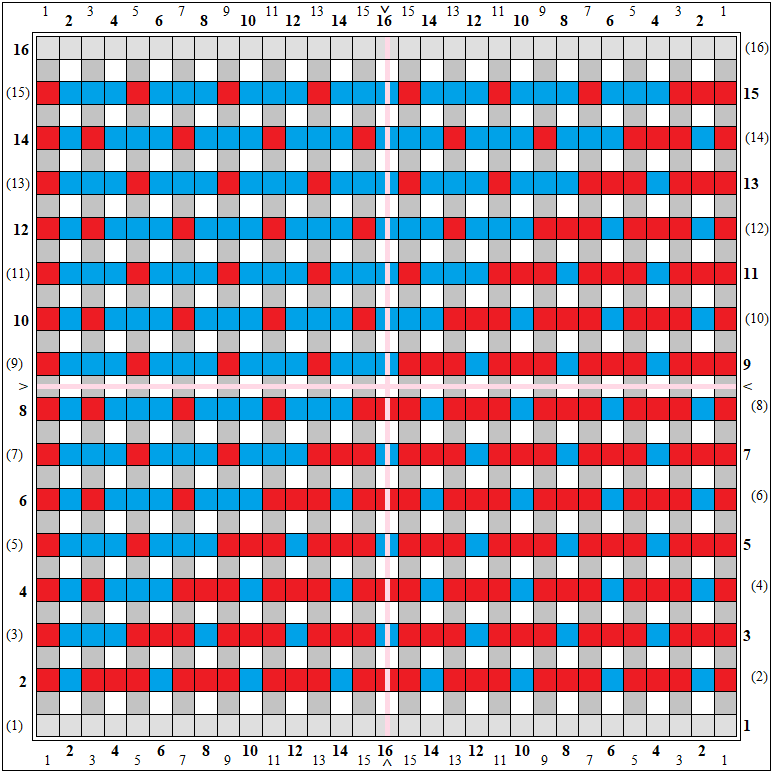
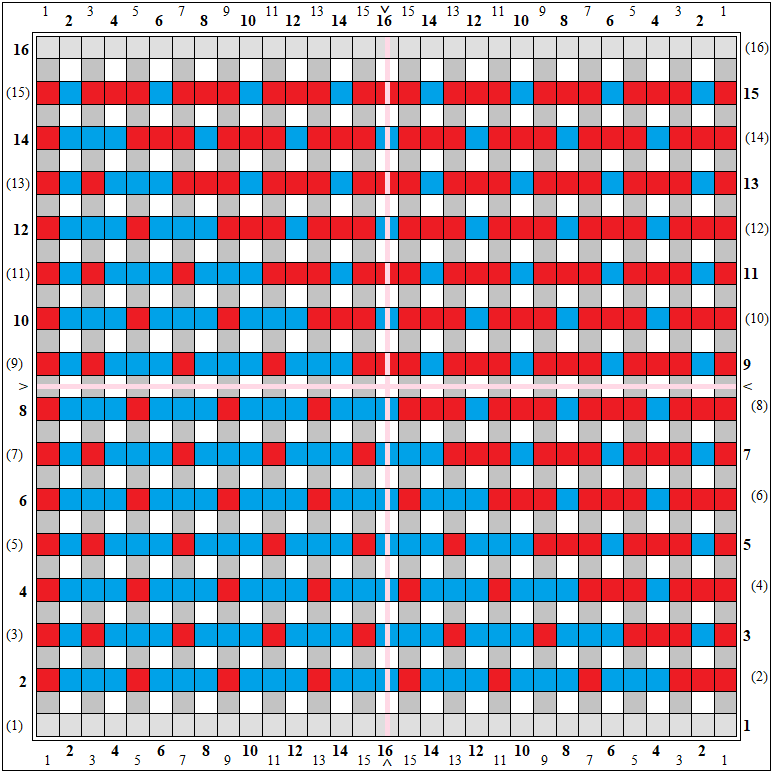
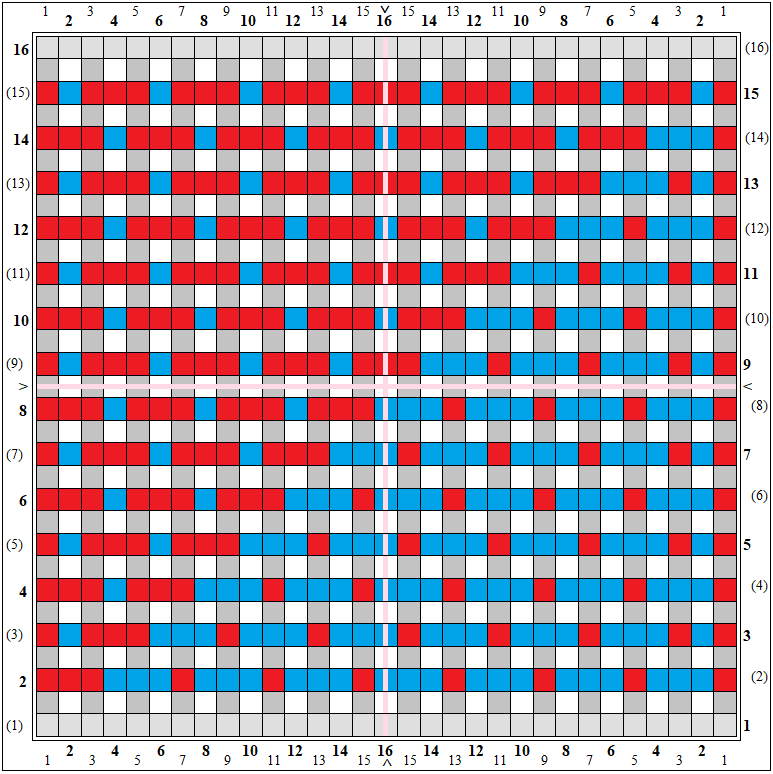
For all these pattern weaves, they provide written instructions. The following diagrams allow the weaver to see the patterns more clearly than the 1938 black-and-white photos show.
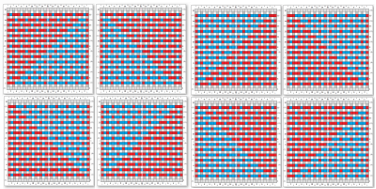
Here are two options for how to join the B-25 squares into 4-square blocks:
Without actually weaving the squares, I’m not sure how the joining would be accomplished unless you have at least two versions of the pattern; I diagrammed four versions. Depending on the joining method, it might be possible to weave the squares using only the original pattern. Then you might choose to alternate the two orientations of 4-square blocks or it might look best to keep them all the same.
The 4-squares are joined into blocks using a matching yarn color. Only the center group of blocks is joined with contrasting color. (Of course you may choose to keep this join the same color or even to use dark brown [or whatever color you chose for the outer frame] to join the center blocks.)
MAKING THE BORDER (BEIGE) SQUARES
Again, instructions are not provided, so I had to figure out how the afghan should look. Use the corner blocks (B-31 and B-32) every time the beige border bends. Use B-33 and B-34 whenever the line points vertically or horizontally. (You can print the photo and draw it out for yourself. This blog post already contains far too many numbers for me to hazard counting the totals myself.)
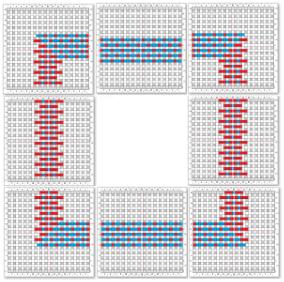
I’ve diagrammed a simple way the corners and borders might link together. In the afghan the path is more complicated.
And I’ve included variations for the two corner patterns (for those who want all their squares to have the same orientation).
FINAL ASSEMBLY
Well, I can’t believe it. I’m writing this post and preparing diagrams as I go along. I thought I had this afghan all figured out and then I started drawing these pink lines on the photo. See what you think. Do those outer borders look like 2″ x 4″ pieces or what? Technically this is perfectly legal because this is a Loomette with bars pattern book. But what if you’re using a Weave-It???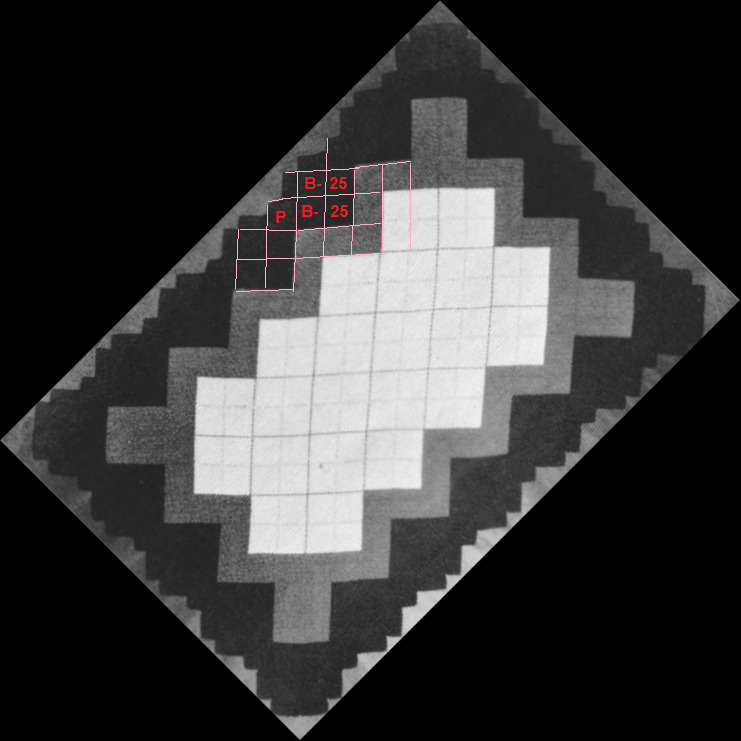
I may be wrong, but I think if you want your afghan to look like theirs, you’re going to need a 2″ x 4″ loom (or you could use 2″ squares sewn together). There’s a template (scroll past the templates for square and triangle looms) for a 2″ x 4″ loom and I’ve provided lots of instructions for easy ways to make your own looms (see Topical Guide: Loom Making)—you can even use sewing pins stuck into cardboard for a little loom like this (though you’d be more comfortable with a foam core/foam mat model).
*************************************
I’m not all that fond of assembling squares into projects, but this photo/instruction analysis has my curiosity piqued. I hope someone will make this afghan and send me photos when it’s finished. Best of luck to you!


Fantastic. Glad to see you blogging again.
This is all quite interesting, but did you over think the beige border? It looks like the regular 4×4 squares. I’m assuming that the parchment squares are four 4×4 squares assembled to make the larger square or is it, I’m not fully awake yet? Anyhow, just an observation. Love all of your work!
Pingback: Diagonal Half Square — 4″ (31 x 31) pattern – Adventures in Pin Loom Weaving
Pingback: Project Planning Tutorial — Companion Squares and the Bigger Picture – Adventures in Pin Loom Weaving