
It’s not often I find the need to change colors on layer 3 (L3). In fact, I’ve avoided it. However, this week I stumbled across an effect that showed up only on the back (in the L1 warps) of a square I wove. In order to get it to show up on the front I needed to change colors on L3 (and redesign the pattern).

Front and back of square
Since this Two-Color Weaving series addresses weaving in ends as you go (WIEAYG [if anyone can come up with a better acronym, please do!!!]), I won’t be discussing what might be a slightly less, or slightly more, complicated way of changing colors—i.e. cutting the yarn thrice or weaving L4 backward, neither of which is preferable in my opinion. After much cogitation, I discovered a way to warp L1 and L2 backward. I may need to draw up some diagrams later, but for now I’ll let the photos illustrate the process. Please don’t get psyched out by the 2″ x 6″ loom shape. The process is the same for square looms.
It helps if you already know the process for changing colors and weaving in ends as you go — L4 only.
WARPING L1-2 and 4
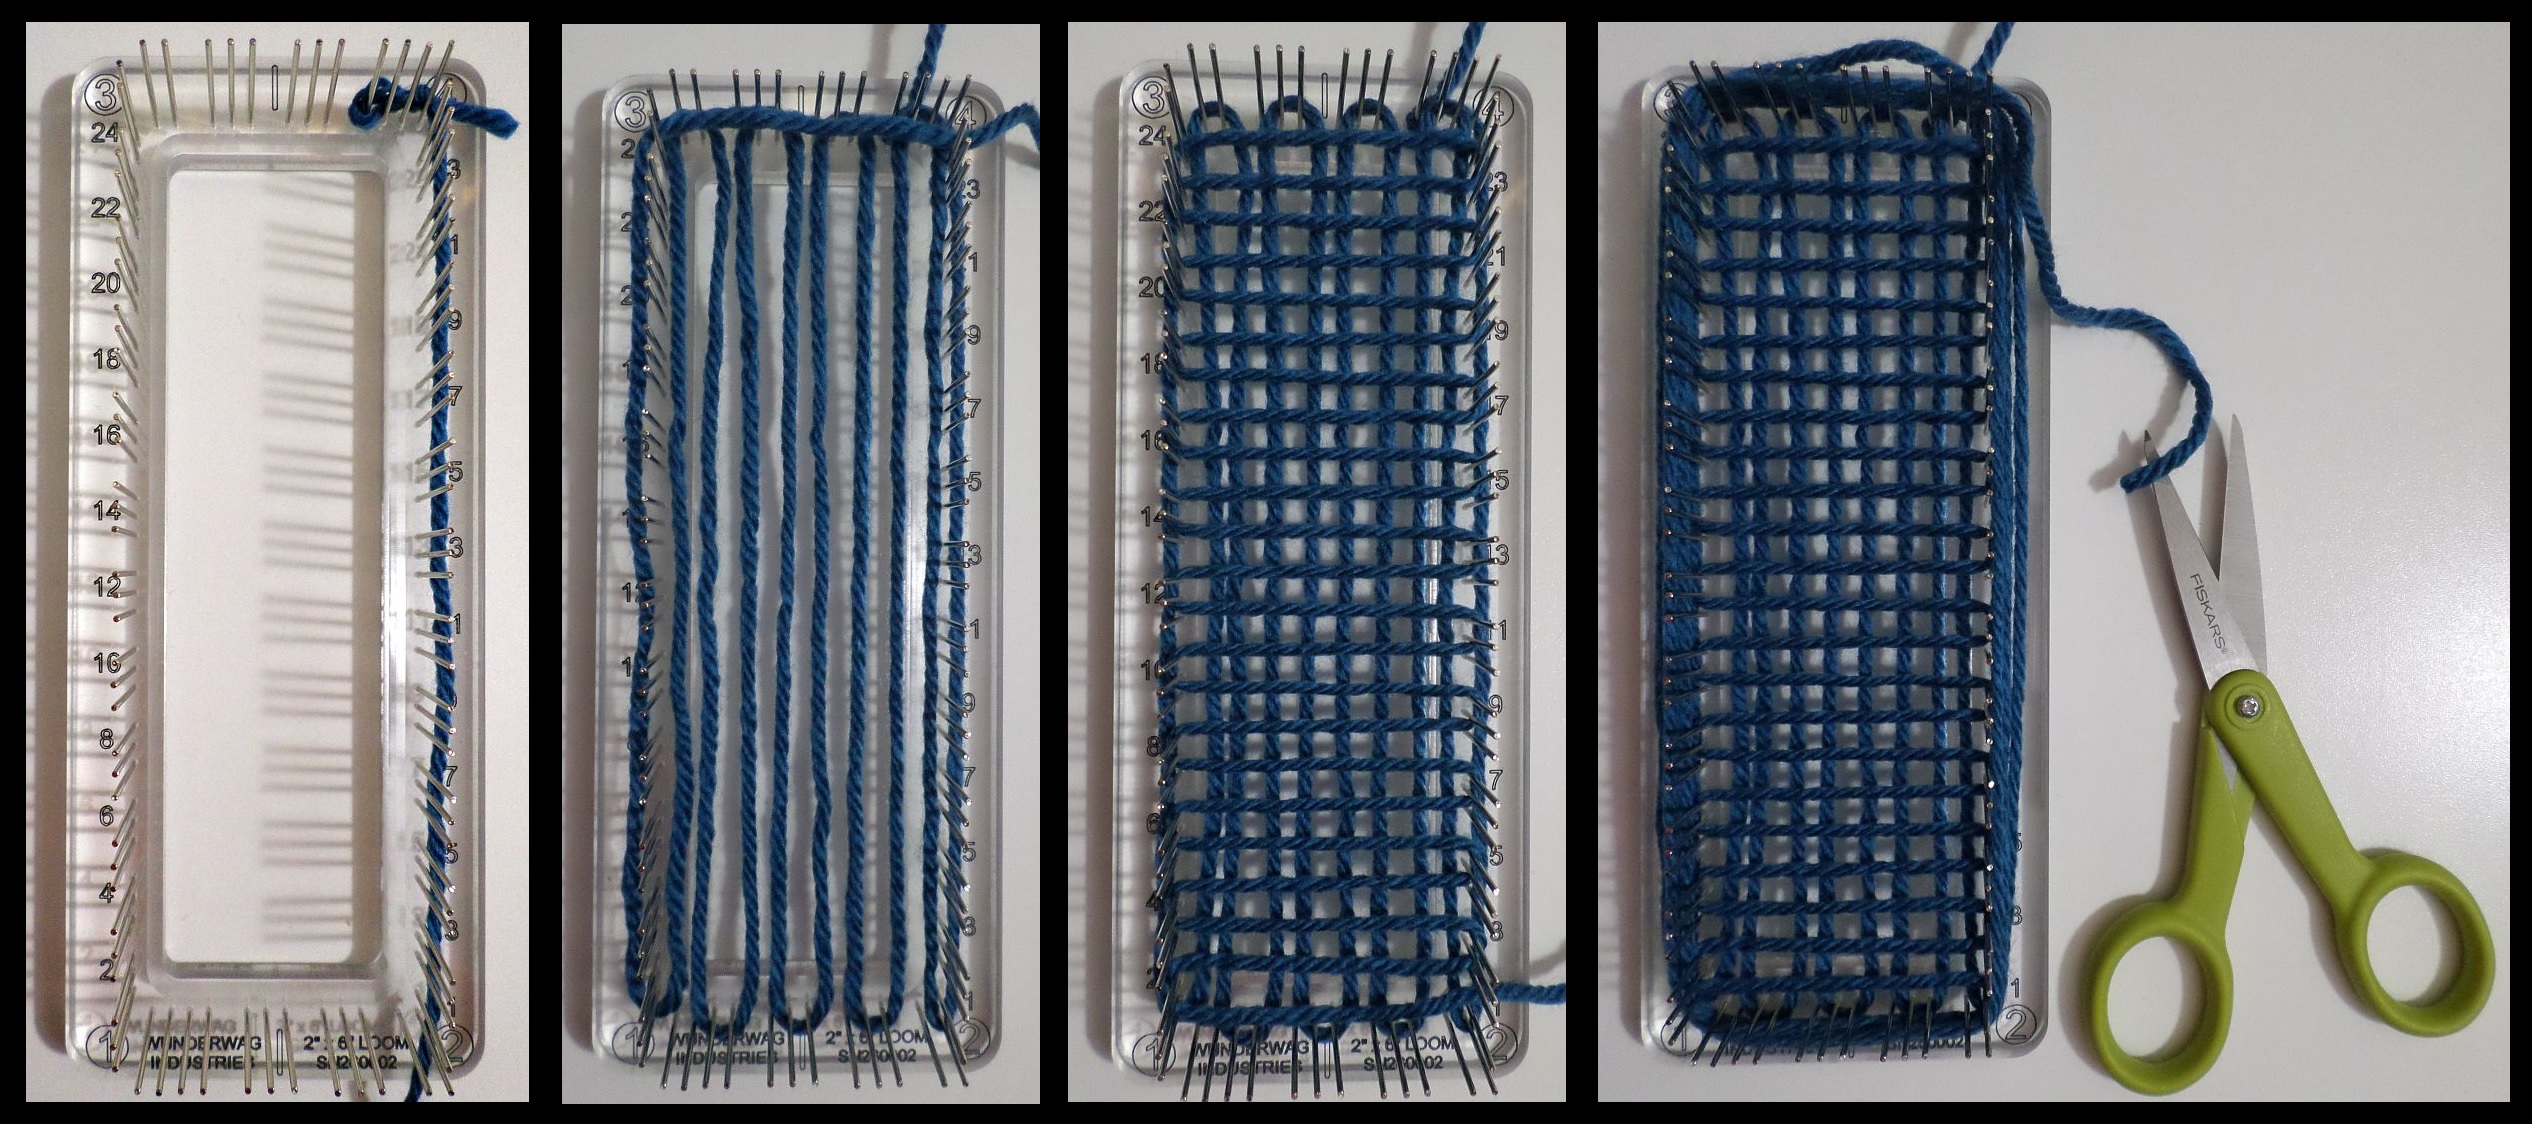
- Begin by tying a reverse slip knot on any pin of the 3-4 side of the loom, near Cr4. Then take the yarn along the outside of the pins down to Cr2.
- Warp L1 backward—at Cr2 take yarn between pins 1 and 2 of the three-pin corner group. Go up to Cr4 and take yarn around pins 3 and 2 of four-pin group. Come down to 1-2 side of loom, take yarn around pins 3 and 2. Continue wrapping pins 3 and 2 till you come to the four-pin group at Cr1—wrap pins 4 and 3; up at Cr3 wrap the two pins there; back down to Cr1. Now take the yarn outside the 1-3 side pins back up to Cr3. KEEP THE YARN A BIT LOOSE at Cr1—you will need to be able to weave under the warp and over the outer tail at the end of row 1.
- Take the tail yarn between the two pins at the top of the 1-3 side of the loom (this step is shown in the second photo). You will now warp L2 from top to bottom. Continue taking the yarn around pins 3 and 2 back and forth across the loom till you get to Cr2. You will end L2 in the space above the three-pin corner group.
- Wrap the yarn around the outer perimeter of all pins to measure weft (see Pin Wraps and Yardage for your loom size/shape). Cut. Unwind yarn and prepare to warp L3.

WARPING L3
- Using a reverse slip knot, tie the yarn onto any pin along the 1-3 side—leave a long enough tail if you plan to weave that end in later. I like to avoid tying onto a corner pin because corners can be a bit tricky to weave around. Take the yarn around Cr3 and go between the two-pin group of the 3-4 side. (In the process of reweaving samples for this blog post, I’ve discovered that you can locate this knot on the 3-4 side of the loom to keep the yarn tail out of the way while weaving.)
- Take the yarn down to Cr1, wrap pins 2 and 3. Continue warping L3 as you normally would—wrapping pins 1 and 2 of each three-pin group. Finish L3 at Cr2 in front of the three-pin corner group. Now it’s up to you to decide where you want to tie the tail. For starters I like to bring it around the corner and tie onto any pin along the 2-4 side of the loom. Later on I move the tail because we won’t be working this one in as we go.


(Note: you could choose to tie the first L3 knot by Cr1, wrap outside the 1-3 side pins, warp L3, take the end tail outside the 2-4 side pins at Cr2, then tie off and cut yarn at Cr4. This would give you double worked-in ends on the outer edges of your square. I don’t like that look myself. L3 tails could be worked in with fringe for a bookmark, worked in along the first and last L3 warp, or worked in across the top and bottom of the piece. If you’re working in the L4 tail, keep in mind that you might need to double up with one of the other worked in ends.)
WEAVING L4
- Row 1: Take the needle OVER the outer tails, UNDER the “first” warp of L1 (it’s actually the last warp of L1, but it’s the first one that gets woven—hmm, kind of scriptural). Because the weft yarn is coming down from above, instead of around the corner and up, the proper yarn intersection will form (warp and its tail will not make a loop that will pull out later on—trust me on this if you can’t see it for yourself).
- Plain weave across R1 exiting UNDER the last warp and OVER the outer tail. You’ll have to pull the tail downward away from pin 1 of the first three-pin group at Cr1 of the 1-3 side of the loom. At this point, I’d move the 2-4 side L3 yarn tail down to the 1-2 side of the loom.
- Continue weaving, following design’s instructions, as you usually would for two-color weaving working in ends as you go, i.e. from R2 on, pull the outer loop outward and scoop UNDER both yarn tail and first warp; go UNDER last warp and outer yarn tail as you exit the row. You’ll want to nudge the L3 tail out of the way as you weave.

- When you exit the second to last row of L4, take the needle UNDER the last warp and OVER the outside tail.

- For the last row, at Cr3 take the needle UNDER the first warp and weave as usual.

Notice the L3 tail is back along the 1-3 side of the loom. I found it wasn’t necessary to catch the tail in the outer weaving loop. You can leave the tail in the loop or out.


WORKING IN THE ENDS
You can’t entirely avoid working in ends, ’tis the nature of the beast we know as Pin Loom Weaving.
Decide what you’d like to do with the L3 yarn tails. I prefer to weave the Cr3 tail in across the top, Cr3 to Cr4. The Cr2 tail gets woven in across row 1—no need to lift the yarn twist at pin #1 (since there isn’t one) though you might want to tighten the long loop securing the end.
FINAL ANALYSIS
Personally, I prefer these two designs in the L1-3/L4 warping rather than changing colors on L3. Still changing on L3 worked best for the bookmark design.

Back and front of Solid Heart design

Front and back of diamond design for 2″ loom

WM design for 2″ x 6″ loom
I’m not seeing any icons, Sue.
Thank you. Please try again… 🙂
Sorry. Not seeing any printer icons. Margaret.
Pingback: Two-Color Weaving Series part 4 — Changing colors for L2 only (L1, 3-4/2) – Adventures in Pin Loom Weaving