By request—a few patterns for the 2″ square loom. Many of these were experiments, but you can play around with them too.

#1
#1
R1: P
R2-7: P2, U3, P3, U3, P4
R8: P Read More →

By request—a few patterns for the 2″ square loom. Many of these were experiments, but you can play around with them too.
#1
#1
R1: P
R2-7: P2, U3, P3, U3, P4
R8: P Read More →
One of my blog readers, Lee Ross, contacted me recently for some advice on designing a dog paw print pattern. I gave her a little advice and she sent me these wonderful results! With her permission, I share her design with you. “Molly’s Paw”—copyright Lee Ross.

Lee Ross—Molly’s Paw 6″ square
I designed this pattern on a different loom and haven’t tried it in both sizes on the Weave-It/Wunderwag style loom yet. It’s based on an extant Weave-It pattern, so it’s probably not totally original to me. However, I made it up on the fly and don’t want to forget it, so I’m documenting it here.
Star Panel (4″)
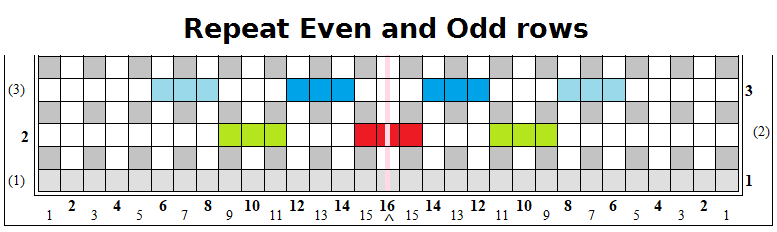
Star Panel—4″ (green and light blue marks are optional)
One of the interesting things about patterns for the 6″ and 4″ looms is that they’re not totally interchangeable. There’s probably a formula, but you’d have to do calculations of some kind. Math is not where my windswept mind likes to settle.
Another thing to consider is the size factor. What looks good on a 4″ square may look overly busy or boring on a larger square.
Here is one of my favorite 4″ weaving patterns adapted for the 6″ loom. It’s called “Horizontal Xs (modified for 6″).” I haven’t tested this one yet, but I’m reasonably sure it will produce an interesting all-over texture pattern.

Horizontal Xs (modified for 6″)
Recently I posted photos of this square and noticed from the photo that I’d made a mistake in Row 16 (R16)—the last row.
When a mistake is near the end of R16, it’s very easy to fix.

Mistake in R16, shown front and back
The X Stitch is generally located in the very center of the square, but it can be placed anywhere.

X, or Knot, Stitch located in the center of a 2″ square
