
Back in August I developed a new technique I call “Reverse Warping Method,” or RWM. It entails starting the warping process at Cr4, instead of Cr1. In effect L4 becomes L1 and the usual L1 becomes the weaving layer.
My first attempt with RWM was a plain weave square. The only discernible difference was that I ended up with a longer tail at Cr1 than usual; Cr4’s tail was shorter.

Horizontal Xs — traditional 3LW (left) and RWM (right)
Using RWM with a texture pattern turns the pattern on its side. The purple squares above are both oriented with Cr1 at bottom left, Cr2 at bottom right, and woven using “Horizontal Xs.” Notice the U3 stitches end up horizontal and the O3s are vertical.
I did a little playing around with this method in August, but didn’t get the result I was looking for at the time, so I shelved it.
And then came November. New patterns, new project, new ideas. I needed an “old” procedure to get the effect I wanted.
Say you want to use a heart motif in a blanket and you want the blanket to look the same from each direction (instead of having a definite top and bottom edge) and you want all your finished squares to fit neatly together with Cr1 at the bottom left, Cr2 at bottom right, etc.
It’s easy enough to turn the heart upside down and weave it top to bottom. That takes care of two edges. What about the other two?
My first thought was that I’d have to draw a diagram for a sideways heart.
Done.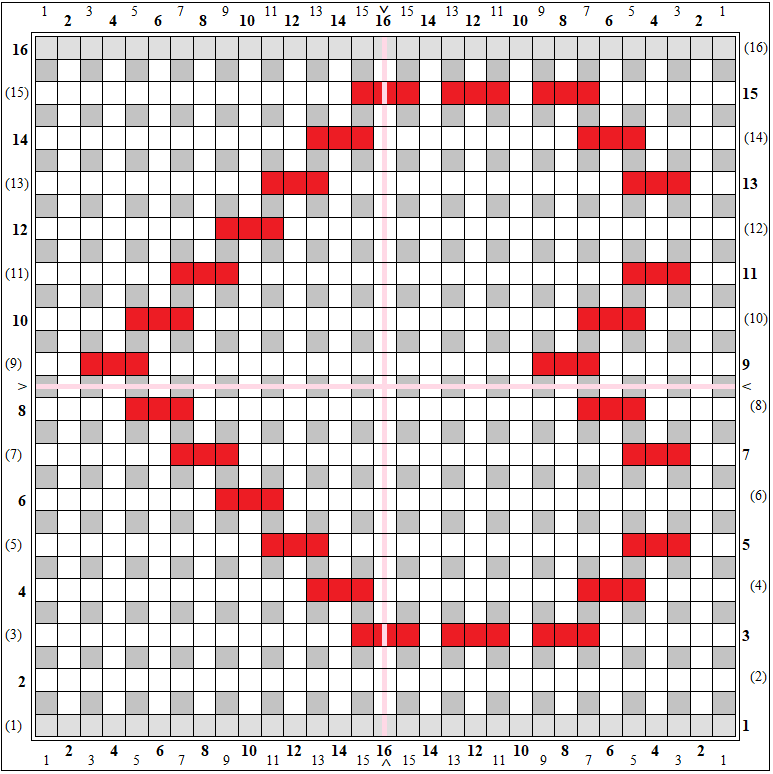 You clearly see the first problem, don’t you? The heart isn’t centered.
Problem two is that the U3s are still horizontal. The individual stitches that make up the heart didn’t turn along with the heart. This, perhaps, is not as great a tragedy as the lack of centering.
Now consider other potential headaches. Say you wanted to use the snowman pattern on a table cloth. You want him pointing four directions, you don’t want to mess up your square placement, and for goodness’ sake you don’t want to redraw that pattern sideways (the heart was bad enough)!
Reverse warping is the solution.

Two hearts woven using traditional warping, two using RWM.
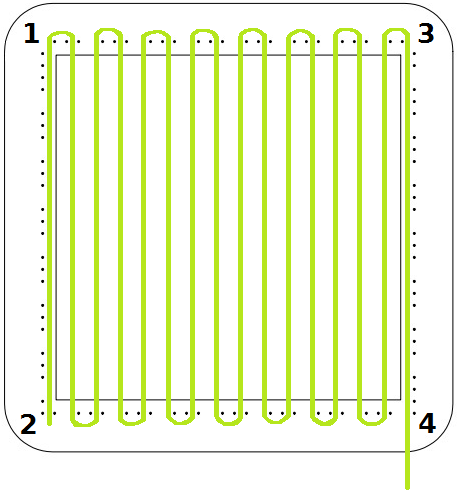
Please note: in the diagram below the loom is turned 1/4 turn clockwise.
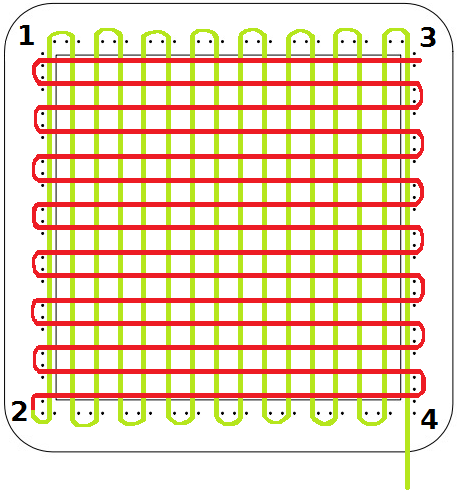
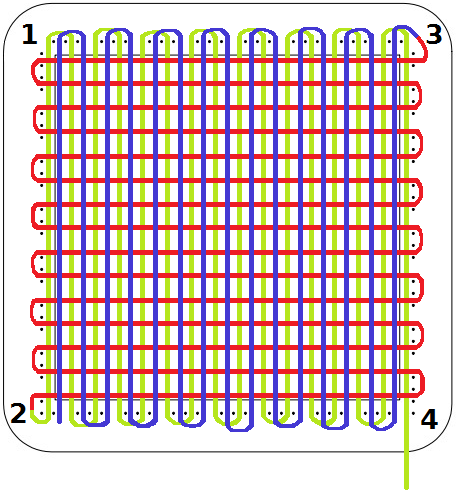
Begin warping L4 at Cr4 and follow what is usually the weaving layer’s path backward. Warp L4, L3, then L2. You’ll begin weaving L1 at Cr2. The 2-4 edge of the loom will be closest to your body. You’ll finish weaving and exit the loom at Cr1.

The unfortunate side-effect-result of this method is that it renders the row numbers and center lines on the loom (if you’re using a Weave-It or Wunderwag loom) useless. How we suffer for our craft!
(But how we benefit as well!)
****************************
UPDATE 12 Dec 2017
Here’s how I modified my 6″ Wunderwag loom so I could keep track of the row numbers for the pattern I would be reverse weaving. It’s kind of hard to see with the glare—I added row numbers to the 1-2 and 3-4 sides of the loom with painter’s tape and a fine point Sharpie. (The row numbers look off in the photo, but they really are in the correct places on the loom.)

6″ loom renumbered for RWM
It turns out I wanted to add center marks as well so I wouldn’t have to do any stitch counting. I counted across to warp #23 (from both sides to make sure I was right) and marked it as the center warp. Then I followed that warp strand down to the opposite side of the loom and added another mark there. Saved having to count all the stitches since the Single Outline Heart (medium sized) is a mirror image motif.
This photo shows how I hold the loom while weaving.

Reverse Warping Method in action
But this is the correct orientation of the loom and the way the heart will appear in the blanket.

Correct orientation of square (when it’s finished)
I designed my blanket so it would look roughly the same from any direction. This particular block will be at the 3:00 position in the blanket.

Check marks represent the number of squares I’ve finished weaving!
Pingback: Side by Side Stripes — 4″ (31 x 31) patterns – Adventures in Pin Loom Weaving
Pingback: Reversible Star Boxes—Part 2 (Reverse Warping Method) – Adventures in Pin Loom Weaving