
The X Stitch is generally located in the very center of the square, but it can be placed anywhere.

X, or Knot, Stitch located in the center of a 2″ square
It can be used on any size loom, in almost any pattern, with varied frequency; e.g. the square pictured above could have had three Xs across the horizontal center row. X Stitch is an interesting way to divide the top and bottom, or side to side, halves of the loom without merely leaving plain weave rows or sections. However, plain weave rows are also an option.
The X Stitch in this demo is worked over three rows. This means that in the three-layer style, it catches the L4 row you’re working, the L2 row below it and the L4 row below that. On a 2″ loom—Rows 5, 4A, and 4 (4A=the L2 row between 4 and 5). On a 4″ loom—Rows 9, 8A, and 8. On a 6″ loom—Rows 13, 12A, and 12.
The basic instructions are:
- Work the lower row of the X Stitch with plain weave (P). On the 2″ loom—R4; 4″—R8; 6″—R12.
- You’ll need to be aware of these four points as you work the X Stitch. The points refer to the openings, the place where you’ll insert the needle. (Point 1 below shows where the yarn is after the needle was pulled through.)

Four Points of the X Stitch
- Begin the second row of the X Stitch by plain weaving to the center warp plus one strand. (Some people go U3 at this point, but I think it looks better on the back to plain weave the stitches; see Other Options below.) On a 2″ loom—P9; 4″—P17; 6″—P25.

Needle pokes out at Point 1 (one warp strand past the center)
- Pull the needle through as though you were at the end of the row. This is Point 1.

Yarn is poking out at Point 1 after needle was pulled through.
- From Point 1, take the needle back over 3 sts and down 3 rows (count the one you’re working on as one of the three rows) and insert it at Point 2.

Insert needle at Point 2
- From Point 2, P3 (below the existing L4 row) to Point 3 and pull the needle through. (The P3 will be the same as the L4 sts of that lower P row.)

From Point 2, P3 below the existing L4 row, and pull needle through at Point 3

Left photo shows Step 6 with cross thread loosely in place.
Right photo shows cross thread pulled snug. (Pinch the area between your thumb and finger while you pull the cross thread snug.) - From Point 3, take the needle back over 3 and up 3; insert the needle at Point 4 above the L4 you started previously. P3 above the final three stitches of that row.

From Point 3, take needle to Point 4; P3 above previously begun row.
- Pull the needle through to tighten the X and P the remaining sts of that row.

Pull second cross thread snug, and P across to finish the row
- Continue on to the next row, following whichever pattern weave you’re using.


This is the way the X Stitch looks on the back.

Back View
OTHER OPTIONS
You can also make the X Stitch by going U3 from Point 4 to Point 1 and again from Point 2 to Point 3, but I don’t think it looks as good on the back or the front. It’s also necessary to choose a method of anchoring the top U3 stitch amongst the warps.

Back view of several U3 methods of making the X Stitch

Front View
******************
If you’re participating in the Shawl Weave-Along (Jan 2018) on the Facebook Pin Loom Weaving Support Group, you’ll be using the 6″ loom.
R12: P
R13: P25, perform X Stitch, P remaining sts.
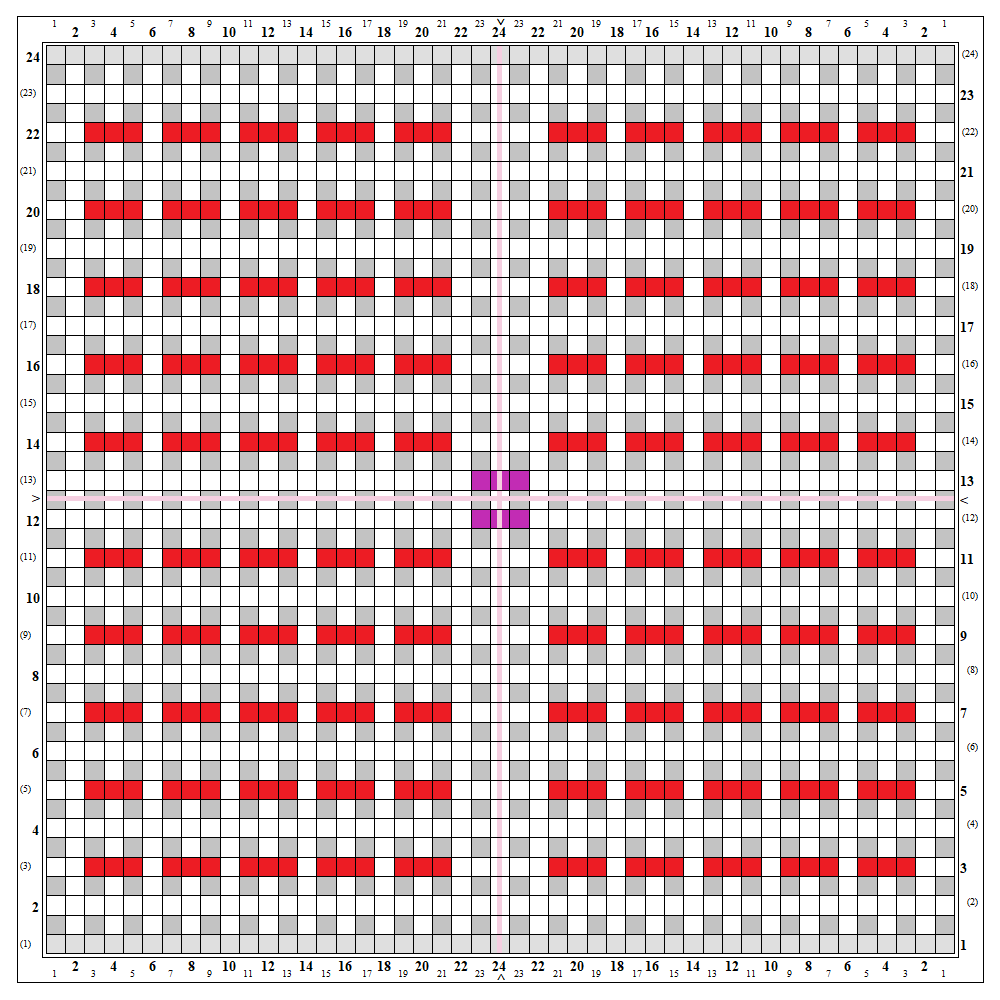
Modified Shaw WAL pattern weave—for 6″ 47 x 47 strand loom. (Purple marks indicate where the X Stitch is performed.)
DEMO ON 6″ LOOM

R12: Plain weave

R13: P25, pull needle through (at Point 1)

Insert needle at Point 2; P3 below R12 sts and pull needle through at Point 3

Gently tighten the first half of the X; insert needle at Point 4; P3 above last three stitches completed on R13 and complete plain weave across. To tighten the X see illustration below.


Finished X Stitch on the loom (with Gisela’s modified pattern)

Finished square off the loom, front

Finished square off the loom, back

Close-up of back and front views of X Stitch
******************
DEMO ON 4″ LOOM
Use this diagram: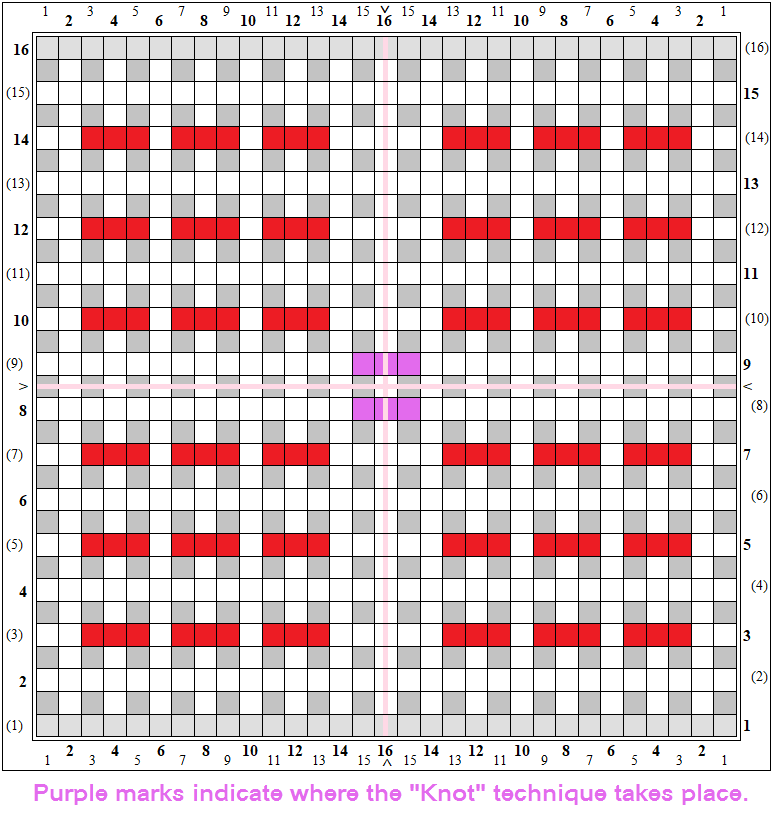

R8: P

R9: P17, pull needle through at Point 1

Insert needle at Point 2; P3 below R8 and pull needle through at Point 3; gently tighten first half of X Stitch

Insert needle at Point 4; P3 above last three sts of R9 and plain weave on across the row; gently tighten the second half of the X Stitch.

The completed X Stitch shown with R14 woven (needle in place)

Finished square off the loom, front view

Finished square off the loom, back view
******************
You may or may not have noticed, there’s a mistake in R16 on the 4″ square. I’ll be demonstrating how to fix that in another post.
Also, please notice that the pattern weave of the 4″ square is less outstanding because of the yarn’s mottled appearance. In general, I recommend solid colored yarn for pattern weaves.