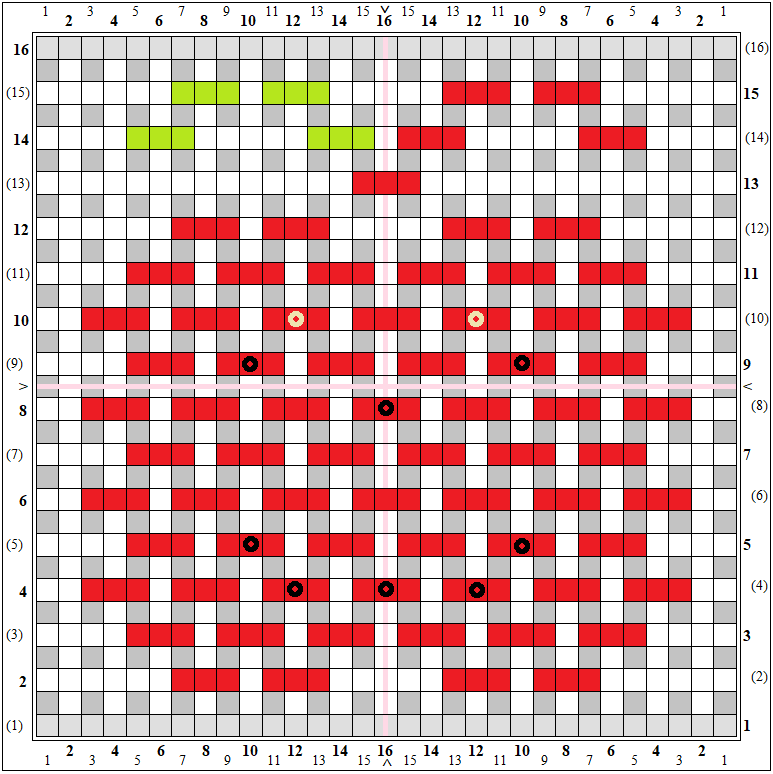
For the last pattern in the Fall Banner project, you get to choose the one you like best.
When I first thought up the project idea I had already designed the pumpkin. After I started laying out my squares, however, I realized the pumpkin was the only one that was an outline—rather than a filled-in shape. I thought the outline didn’t look good with the others.
But then I had new problems.
I redesigned the filled-in pumpkin several times and nothing looked good. I realized I was still using the same colors (orange and green); these didn’t work well on the filled-in pumpkin. After changing colors I got more pleasing results. I like them equally, so I’m posting both (and “Pumpkin Outline” is in the next post). You can choose which one(s) you’d like to use.
INSTRUCTIONS
- Make two for the Fall Banner
- Please note: the direction of the pumpkin stems changes according to banner side (see photo at the bottom of this post). For each pattern, follow R1-13 no matter which direction you want the stem to go. Stem direction is determined on R14-15.
Pumpkin 1 — Ribbed Pumpkin
Sample — L1-3: RHS “Tangerine,” L4: YBSS “Saffron”

Ribbed Pumpkin — For R14-15, to have the stem extend right, follow the red markings; ignore the green marks (they will be plain weave). For stem extending left, follow green marks and ignore red ones.
Pumpkin 2 (with or without *beads)
Sample — L1-3: RHS “Tangerine,” L4: YBSS “Saffron”
(Uses 8 beads distributed on L3 warps #5, #6, #8, #10, and #11. I used 6/0 Rocaille, or seed, beads.)


This chart shows two options for eye location. I like the eyes better farther apart, but my husband preferred them closer to the center—your choice.
*For instructions on adding beads, look at this blog post (with videos). Also, you can search “bead” on my Windsweptmind blog for other posts about adding beads.
*********************************


