
Weaving with two or more colors is a great way to enhance and enliven your weaving. Though it’s annoying to weave in ends, I find it’s worth the effort because it’s fun to use two colors and the results are often beautiful. (I developed a method of working in ends as I go—see links at the bottom of this post).
By accident I discovered that changing colors on different layers makes a pattern look different. It can change a blah pattern into something spectacular. Case in point:
“Diamonds Stitch” (See Glossary for explanation of abbreviations)
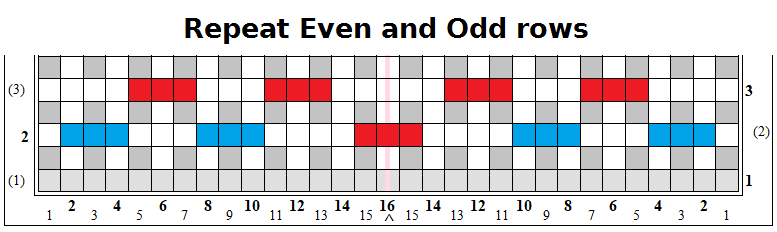
R1: P (plain weave)
Even Rows: U1, O3, P3, O3, P4, U3, P4, O3, P3, O3, U1
Odd Rows: P4, U3, P3, U3, P5, U3, P3, U3, P4
R16: P
By changing colors after L1, I got a much more spectacular design than the one I got changing colors after L3.

“Diamonds Stitch” (also known as “Alternating Dashes”) with color change after L1

“Diamonds Stitch” with color change on L4. Because of its appearance, I originally called it “Alternating Dashes”—not realizing the two patterns were the same.
Over the last few days, I’ve been experimenting with the original pattern instructions, developing some variations, and comparing which color combinations work best for this pattern.
Diamonds Stitch Variation 1
R1: P
Even Rows: U1, O3, P3, O3, P11, O3, P3, O3, U1
Odd Rows: P4, U3, P3, (U3, O1) x 2, U3, P3, U3, P4
R16: P
I concluded that this variation is boring. There is a subtle placement difference of the white ditto marks in each square. The original pattern is more dynamic, so I would reject this variation.

“Diamonds Stitch” original and variation 1. Colors used on both samples—L1: DNE “White,” L2-4: YBSS “Pink”
Diamonds Stitch Variation 2
R1: P
Even Rows: U1, O3, P3, O3, P4, U3, P4, O3, P3, O3, U1
Odd Rows: P4, U3, P4, O3, P3, O3, P4, U3, P4
R16: P
I like this variation as much as the original pattern. It’s a little more uniform in appearance, so that’s its chief difference. I’ve shown the three color combinations together to point out that in this pattern, it’s my opinion that the pattern shows up best using a darker color on L1 and a lighter contrasting color on L2-4. Though the photo almost makes the green and blue samples look the same, in real life the blue doesn’t show the pattern as well. The third sample takes us back to the look of “Alternating Dashes,” which I think is much less interesting looking.

“Diamonds Stitch” Variation 2
Sample 1—L1: YBSS “Hot Turquoise” L2-4: YBSS “Lt. Aqua”
Sample 2—L1: BS “Lapis” L2-4: YBSS “Lt. Denim”
Sample 3—L1-3: YBSS “Flamingo” L4: DNE “White”
I can’t seem to work on a pattern without converting it to checkerboard or nine-patch variation, so here it is.
Diamonds Stitch Variation 3 (Checkerboard)
R1: P
R2: U1, O3, P3, O3, P11, O3, P3, O3, U1
R3: P4, U3, P3, U3, P5, U3, P3, U3, P4
R4: Rpt R2
R5: Rpt R3
R6: U1, O3, P3, O3, P4, U3, P4, O3, P3, O3, U1
R7: P8, (U3, O1) x 3, U3, P8
R8: P10, (U3, O1) x 2, U3, P10
R9: Rpt R7
R10: Rpt R8
R11: Rpt R2
R12: Rpt R3
R13: Rpt R2
R14: Rpt R3
R15: Rpt R2
R16: P

“Diamonds Stitch” Variation 3 (Checkerboard)
Sample 1—L1: DNE “White” L2-5: YBSS “Lilac”
Sample 2—L1: YBSS “Flamingo” L2-4: BS “Sea Shell” (I made a mistake in the top right area.)
Once again, I prefer the darker color on L1 and the lighter color on L2-4.
*************************************************
UPDATE 23 Aug 2017
Apparently I made mistakes when I copied and pasted certain lines repeated from one pattern to the next yesterday. Inadvertently, I created a new variation. Here are the instructions if you’d like to try it as well.
Diamonds Stitch Variation 4
R1: P
Even Rows: U1, O3, P3, O3, P11, O3, P3, O3, U1
Odd Rows: P4, U3, P4, O3, P3, O3, P4, U3, P4
R16: P
*************************************************
Links for Working in Ends and Changing Colors
This post shows how to change colors both simply (without working in ends as you go) and more complexly. It’s a good basic course in changing colors.
This post shows how to work in ends as you go and contains instructions for the “Diamonds Stitch” pattern.
This post shows many ways to work in ends while changing colors on different layers.
This is one of my earlier posts on the subject. It explains some color theory.
This post shows a basic way of working in ends NOT as you go, but after the fact. It contains a short video.
This is my video on changing colors and working in ends as you go.
Wow–such complex patterns. I’m so glad you have the patience to work these out because just thinking of trying to do them triggers my worst dyslexia! But the beauty of the finished product is undeniable. Thank you for sharing this!
Thanks Janice. It’s a combination of patience and practice, I guess. I’m kind of obsessed with “What if . . . ?” when it comes to pin loom weaving. It’s a lot less complex when you’re in the midst of doing it–one row at a time!